Showing posts with label Branding Objects. Show all posts

Monday, June 13, 2016

PeopleTools 8.55 - Oracle JET - Using ACE Editor for Online Branding Objects (HTML, JavaScript, Style Sheets)

Have you ever wondered if there is a better way to edit the "Branding Objects" that are available online (PeopleTools > Portal > Branding > Branding Objects)?

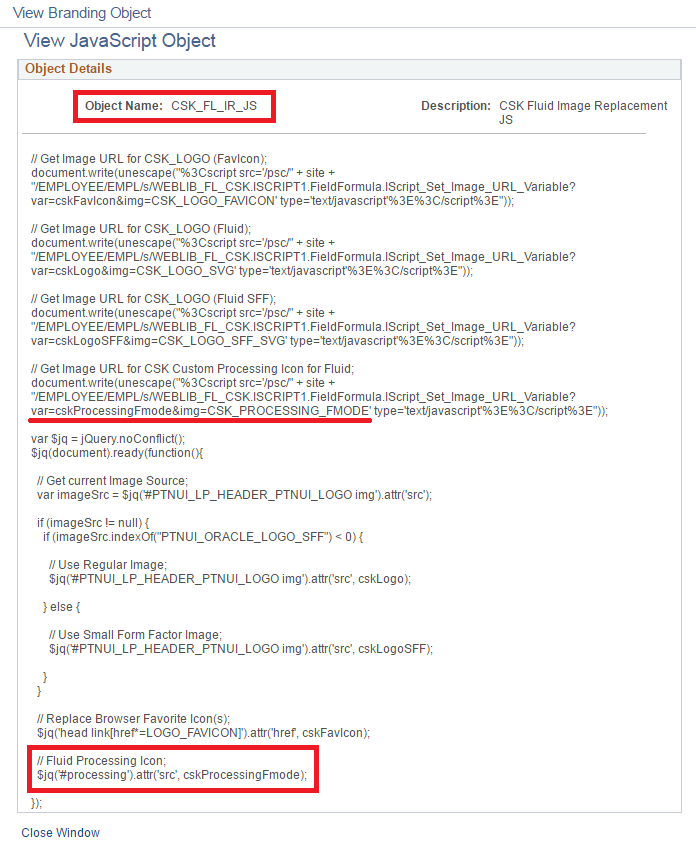
If you have managed Branding Objects (JavaScript, HTML and CSS) online, you would have noticed that the editor is a simple 'textarea'. It is not a great UI and it makes it really difficult to manage/write anything more than a few lines.

E.g.:


Although it is great that, starting with PeopleTools 8.53, we now have the ability to manipulate javascript, html and css objects online (instead of using App Designer), the major part of reading/understanding/writing the code probably needs to be done outside on a text editor which has better support for the markup/syntax.

Why not a code editor for the web?

If you attended Jim Marion's popular session 'PeopleTools Tips and Techniques' either at Oracle OpenWorld 2015 conference or HEUG - Alliance 2016 conference, you might have seen him show us how he created a custom page to manage javascript content using ACE Editor. When I asked him how he built something like that, he mentioned that he used AJAX to marshal the content and the page itself is fronted by a component for searching, but is really an iScript for display and an iScript for saving. It was a brilliant idea to use a high performance code editor to manage such objects (some features/benefits include auto complete, syntax highlighter for over 100 languages, better maintenance/display of indending/outdending, folding function/code modules and overall better readability).

Jim's approach involved storing the javascript contents in a custom table and then referencing them as needed. I wanted to take the same idea and create a mechanism to integrate ACE Editor with any page field (textarea). At the same time, I did not want to customize anything. So, I want my approach to be very similar to creating/enabling Rich Text page fields but instead of using App Designer, I want to simply inject a custom javascript to the page and enable the ACE Editor. Another difference with my approach is that I want to use JavaScript and the component processor to take care of marshaling and saving the data instead of using the AJAX/IScripts option.

Do any challenges come to mind?

- How do we replace the existing 'textarea' on the page with the ACE Editor?
- Next, how do we transfer the contents of the ACE Editor to the page field 'textarea'?
- Next, how do we make the component processor accept and honor this change made to the buffer via JavaScript (especially because we are not customizing the page and the page field may not have the 'Modifiable by JavaScript' setting enabled)?

Here are steps I went through to integrate ACE Editor with the PeopleTools - Branding Objects Page. If you like this idea and implementation, then please click here to vote for it on My Oracle Support Community.

Note:
  1. A similar approach could be used to extend the ACE Editor functionality to any other page field - textarea.
  2. I used the latest version of my 'Global JavaScript/Style Sheet Injection Bootstrap' (using Oracle JET and more importantly requireJS) to inject a custom javascript into the 'Branding Objects' page. If you choose not to use this approach, then you will need to find an alternative way to inject the custom javascript but the core functionality of the js code should work as described. (Refer: 'Using Oracle JET' series - Part 1, Part 2, Part 3 and Part 4).
Step 1: Download the ACE Editor library and store it locally on the web server

I downloaded the ACE Editor library from the following github URL and placed it on my web server:
https://github.com/ajaxorg/ace-builds/archive/master.zip

Web Server:


Just to show the library folder structure, here is a screenshot highlighting the path to the ace.js file.


Step 2: Add new function cskGetFormName() to our JS Bootstrap (CSK_FL_BOOTSTRAP_JS)

Function Name: cskGetFormName


This function helps us resolve the %FormName meta-html which is not available currently for client side javascript. So, we cannot use it, for example, as submitAction_%FormName in a client side javascript. The expectation is that it would resolve itself to submitAction_win0, submitAction_win1 or submitAction_winN depending on the current window. So, I wrote this function to determine the %FormName portion as a string, which I will be using in the next step as part of FSU_ACE_CFG_JS javascript code.

Step 3: Create Custom JavaScript Object (CSK_ACE_CFG_JS) to configure the ACE Editor on the desired page

JavaScript Object: CSK_ACE_CFG_JS


Explaining the Script:
  • First, you will notice that I am adding the ACE Editor library path to the requireJS configuration locally instead of using the requireJS configuration script object (CSK_REQUIIRE_CFG_JS). The reason I am appending to the requireJS paths locally is because, we don't want this library to get loaded for the entire application, rather just conditionally to a specific page. In step 4, I will detail how to achieve that using the Global Injection Bootstrap (CSK_FL_BOOTSTRAP_JS).
  • Next, I am defining jquery, ace.js and jqueryui as dependencies for the function execution using requireJS.
  • Inside the function execution, I included BOOTSTRAP 3.0.0 (which was downloaded from this link and stored in a custom object) and JQUERY 1.8.17 (delivered object) CSS. I am using the custom function cskLoadCSS to take care of the CSS loading.
  • Next, I search for the textarea (id="PTBR_MGOBJ_WRK_PTBR_HTMLAREA1"), hide it and replace it with the ACE Editor div.
  • Now the delivered textarea is hidden and our custom ACE Editor is in the DOM. Further, I used a basic set of configuration options for the Editor which we can certainly expand depending on our use case (ACE Editor is highly configurable). Also, I am dynamically setting the mode of the Editor to either html, javascript or css depending on the object type that we are updating. As part of the Editor configuration, I also initialized the contents of the ACE Editor with the contents of textarea.
  • Lastly and most importantly, we update the textarea (now hidden) with the latest contents of the ACE Editor any time there is a change in the editor contents. 
  • addchg_%FormName Function: The trick to make the component buffer accept and honor the changes made to the textarea (PTBR_MGOBJ_WRK_PTBR_HTMLAREA1) - via client side javascript - is to use the addchg_%FormName function. I had no idea about the existence of such a function and its significance. I learned about this gem from Chris Malek while discussing and troubleshooting an unrelated issue with Fluid!

Step 4: Conditionally Load ACE Editor Config JavaScript (CSK_ACE_CFG_JS) using the Global JavaScript Injection Bootstrap

The conditional logic to only load CSK_ACE_CFG_JS on the Secondary Page PTBR_ADDHTML_SEC, can be found in the cskInjectJS function which is part of CSK_FL_BOOTSTRAP_JS object. An updated version of CSK_FL_BOOTSTRAP_JS source code can be found here.


Results:

HTML:


JavaScript:


CSS:


Now we are ready to enjoy the ACE Editor for writing code! Once again, if you like this idea and implementation, then please click here to vote for it on My Oracle Support Community.

Wednesday, March 16, 2016

PeopleTools 8.54+ - Branding - Part 5D - Fluid Branding (Continued)

Overriding the "Processing" Icon:


This requirement is similar to overriding the Favorite Icon. The "Processing/Spinning" icon generally appears when the PeopleSoft PIA is still processing a request. This "Processing" icon is simply a GIF image - PT_PROCESSING_FMODE delivered image object. In some scenarios, this delivered icon may not really fit in with the custom Branding theme. If we want to override this icon then there are two options.

Option 1: Replace delivered GIF image object PT_PROCESSING_FMODE with a custom GIF image object. This is not something I would recommend but it is an option for those looking for a quick and dirty override (along the lines of Doc ID 2004996.1).

Option 2: Use the jQuery image replacement technique detailed in the previous post for overriding this delivered image PT_PROCESSING_FMODE with a custom image (CSK_PROCESSING_FMODE).

I am using the following image as my custom "Processing" icon:


Delivered PT_PROCESSING_FMODE image for reference:


I am updating my image replacement javascript object CSK_FL_IR_JS again. I am finding all the occurrences of PT_PROCESSING_FMODE (delivered image) with id = "processing" and replacing it with a custom image (CSK_PROCESSING_FMODE) using jQuery.


Updated javascript (CSK_FL_IR_JS) for reference:

// Get Image URL for CSK_LOGO (FavIcon);
document.write(unescape("%3Cscript src='/psc/" + site + "/EMPLOYEE/EMPL/s/WEBLIB_FL_CSK.ISCRIPT1.FieldFormula.IScript_Set_Image_URL_Variable?var=cskFavIcon&img=CSK_LOGO_FAVICON' type='text/javascript'%3E%3C/script%3E"));

// Get Image URL for CSK_LOGO (Fluid);
document.write(unescape("%3Cscript src='/psc/" + site + "/EMPLOYEE/EMPL/s/WEBLIB_FL_CSK.ISCRIPT1.FieldFormula.IScript_Set_Image_URL_Variable?var=cskLogo&img=CSK_LOGO_SVG' type='text/javascript'%3E%3C/script%3E"));

// Get Image URL for CSK_LOGO (Fluid SFF);
document.write(unescape("%3Cscript src='/psc/" + site + "/EMPLOYEE/EMPL/s/WEBLIB_FL_CSK.ISCRIPT1.FieldFormula.IScript_Set_Image_URL_Variable?var=cskLogoSFF&img=CSK_LOGO_SFF_SVG' type='text/javascript'%3E%3C/script%3E"));

// Get Image URL for CSK Custom Processing Icon for Fluid;
document.write(unescape("%3Cscript src='/psc/" + site + "/EMPLOYEE/EMPL/s/WEBLIB_FL_CSK.ISCRIPT1.FieldFormula.IScript_Set_Image_URL_Variable?var=cskProcessingFmode&img=CSK_PROCESSING_FMODE' type='text/javascript'%3E%3C/script%3E"));

var $jq = jQuery.noConflict();
$jq(document).ready(function(){

  // Get current Image Source;
  var imageSrc = $jq('#PTNUI_LP_HEADER_PTNUI_LOGO img').attr('src');

  if (imageSrc != null) {
    if (imageSrc.indexOf("PTNUI_ORACLE_LOGO_SFF") < 0) {

      // Use Regular Image;
      $jq('#PTNUI_LP_HEADER_PTNUI_LOGO img').attr('src', cskLogo);

    } else {

      // Use Small Form Factor Image;
      $jq('#PTNUI_LP_HEADER_PTNUI_LOGO img').attr('src', cskLogoSFF);

    }
  }

  // Replace Browser Favorite Icon(s);
  $jq('head link[href*=LOGO_FAVICON]').attr('href', cskFavIcon);

  // Fluid Processing Icon;
  // 20160420 - Updated selector to be more specific to Fluid using src attribute wildcard;

  $jq('#processing[src*=PT_PROCESSING_FMODE]').attr('src', cskProcessingFmode);

});


Result:


Check out this demo video >>>> Override Processing Icon

Monday, November 23, 2015

PeopleTools 8.54+ - Branding - Part 5B - Fluid Branding (Continued)

Before I start this post, I must apologize for the delay. This post has been on my "to do" list for a very long time but unfortunately other priorities had pushed it back. I finally managed to find time to go over some of the additional ("more advanced") topics that I wanted to cover on Fluid Branding continuing on my previous post Part 5A (using HCM 9.2 PUM Image 12 - PeopleTools 8.54.08).

It is common knowledge by now that there are several new configurable branding capabilities coming our way in PeopleTools 8.55 - particularly for Fluid. I learnt from various presentations at Oracle OpenWorld 2015 that moving forward - starting from PeopleTools 8.55 - there will be only one Branding (or in other words navigation experience) and it would be Fluid based. With that said, I still feel that this post would be useful/relevant for several folks who are currently on PeopleTools 8.54 or planning to upgrade to PeopleTools 8.54. Given that PeopleTools 8.55 has an expected GA perhaps by end of this year or early next year, it would still be a while before everyone gets in on the uptake!

Before I dive deeper, I want to share couple of topics (utilities) which will help us with some of the more advanced branding requirements.

Global JavaScript Injection Bootstrap for Fluid UI:

In my previous branding posts, we saw how we could inject custom style sheet overrides for Fluid UI using the online configuration options available in PeopleTools 8.54 (Assemble Themes - Global Override Style Sheet - follow the link for more details). This online configuration provides a mechanism to easily override delivered styles without any customizations.

But one of the major let downs with Fluid in 8.54 (at least from my perspective) is the fact that there is no way to inject javascript globally using a configuration (similar to style sheets). If we recall from my previous posts, we used the Branding System Options to inject Google Analytics javascript globally across the application for classic components (follow the link for more details). Once again, this online configuration ensures that the listed javascripts are injected in all components without any need for customizations. This helps us to avoid some of the hacks we used in the past for such injection e.g.: customizing the delivered javascript objects (PT_COMMON, PT_PAGESCRIPT, etc.). But unfortunately, the javascripts listed under 'Branding System Options' are not getting injected into the Fluid UI components.

Another disappointment for me (with regards to Fluid in PeopleTools 8.54) was that the jQuery and jQuery UI javascripts that were delivered for classic (injected globally as part of the Branding Header Definition - refer screenshot below) are NOT part of any of the Fluid UI pages/components. This is exasperated by the fact that we cannot really inject our custom javascript objects globally into Fluid!


The ability to inject javascript objects is very important for performing some of the more advanced branding tasks (which should be reasonably clear from the my preceding introduction and examples). With that in mind, I wanted to create my own framework (or bootstrap if you will) to inject custom javascript objects into Fluid UI pages. I am sure there are several ways to "skin the cat" but here are the principles or drivers for my approach:

- Should be least intrusive from a customization point of view. That is to customize the least amount of objects.
- Should be highly configurable. That is to build a bootstrap configuration that allows us the flexibility to dynamically add/remove javascripts objects online (on the fly) without repeatedly customizing.

Note: I ended up adding one line of custom code to a delivered PeopleCode object. Other than that, this framework is entirely configurable online (using the Branding Objects page).

Step 1: Create a custom javascript object

Navigation: Main Menu > PeopleTools > Portal > Branding > Branding Objects (JavaScript Tab)

Note: This javascript object needs to be added online so that it provides a configuration to inject additional javascript objects.

Let us create CSK_FL_BOOTSTRAP_JS as shown in the screenshot below. I will explain the placeholder javascript later as we start injecting other javascripts (using this javascript as a configuration).


Placeholder JavaScript Code - Updated on 20160403:

Updated on 20160403: I found a better way to dynamically retrieve the site name using the delivered getSiteName function (part of PT_COMMON javascript object) which seems to be a lot more efficient than my previous approach.

// This section was commented on 20160403
// Conditional logic for site name which might vary based on current DB instance;
// var dbname = String('%dbname').toUpperCase();
// if (dbname == "HCM92012")
// {
//   var site = "ps";  
// }
// Repeat preceding logic for other instances (DEV, TEST, QA & PROD);
// This section was commented on 20160403

// This line was added on 20160403
// Use delivered getSiteName function for dynamically retrieving the site name for different environments.
var site = getSiteName();

 
// -- NOT REQUIRED (20160403) -- Repeat preceding logic for other instances (DEV, TEST, QA & PROD);
// E.g.:
// if (dbname == "HCMDEV")
// {
//    var site = "psdev";  
// }

// Inject javascript(s);


Step 2: Add custom code to PT_HEADERPAGE.Activate (Page Activate PeopleCode)

PT_HEADERPAGE is a header page that is part of all Fluid UI components and is mainly used for navigation purposes. We will be adding a line of code to inject our bootstrap javascript using peoplecode.


Custom PeopleCode:

/* CSK Custom Javascript Bootstrap for Fluid - Start */
AddJavaScript(HTML.CSK_FL_BOOTSTRAP_JS);
/* CSK Custom Javascript Bootstrap for Fluid - End */


Step 3: Inject Javascript

Now that we have our custom javascript object (CSK_FL_BOOTSTRAP_JS) injected into all Fluid UI components, we can use that as a configuration to further inject other javascript objects.


Custom JavaScript (CSK_FL_BOOTSTRAP_JS):

// This section was commented on 20160403
// Conditional logic for site name which might vary based on current DB instance;
// var dbname = String('%dbname').toUpperCase();
// if (dbname == "HCM92012")
// {
//   var site = "ps";  
// }
// -- NOT REQUIRED (20160403) -- Repeat preceding logic for other instances (DEV, TEST, QA & PROD);
// This section was commented on 20160403

// This line was added on 20160403
// Use delivered getSiteName function for dynamically retrieving the site name for different environments.
var site = getSiteName();


// Inject javascript(s);


// jQuery - PT_JQUERY_1_6_2_JS;
document.write(unescape("%3Cscript src='/psc/" + site + "/EMPLOYEE/EMPL/s/WEBLIB_PTBR.ISCRIPT1.FieldFormula.IScript_GET_JS?ID=PT_JQUERY_1_6_2_JS' type='text/javascript'%3E%3C/script%3E"));

// CSK Fluid Image Replacement JS;
document.write(unescape("%3Cscript src='/psc/" + site + "/EMPLOYEE/EMPL/s/WEBLIB_PTBR.ISCRIPT1.FieldFormula.IScript_GET_JS?ID=CSK_FL_IR_JS' type='text/javascript'%3E%3C/script%3E"));
 

  • The reason I am using the delivered IScript (IScript_Get_JS) in conjunction with document.write is because I am not able to use %JavaScript meta-HTML functions in javascript objects (in the same fashion as we do in HTML objects). Perhaps a future enhancement if anyone from Oracle is listening? :)
  • The delivered IScript provides a way to resolve the javascript (at runtime) to the URL suitable for referencing the .js file on the web server (cache directory).
  • I am using the custom variable site as a mechanism to make this javascript production ready and database refresh proof. This would allow the javascript to dynamically determine the sitename using variable substitution instead of hardcoding.

In the above example, you can see that I used the javascript object, CSK_FL_BOOTSTRAP_JS, as an online configuration to inject additional javascript objects with the following line of code.

document.write(unescape("%3Cscript src='/psc/" + site + "/EMPLOYEE/EMPL/s/WEBLIB_PTBR.ISCRIPT1.FieldFormula.IScript_GET_JS?ID=PT_JQUERY_1_6_2_JS' type='text/javascript'%3E%3C/script%3E"));


IScript for Image Object Source URL Resolution:

If we look into the WEBLIB_PTBR.ISCRIPT1.FieldFormula, we will find several useful IScripts similar to IScript_GET_JS that we used in the preceding section.

Since using meta-HTML such as %Image and %JavaScript does not seem to work in JavaScript objects, I tried to see if there was an IScript which might possibly return the URL suitable for referencing an image object on the web server (loaded on the cache directory). I did not find any delivered IScripts that did something like that so I wrote my own version.

WEBLIB_FL_CSK.ISCRIPT1.FieldFormula - IScript_Set_Image_URL_Variable


PeopleCode for Reference:

Function IScript_Set_Image_URL_Variable
 
   Local string &var = %Request.GetParameter("var");
   Local string &img = %Request.GetParameter("img");
  
   Local string &html = GetHTMLText(HTML.CSK_IMAGE_URL_JS, &var, &img);
  
   %Response.Write(&html);
  
End-Function;


HTML Object - CSK_IMAGE_URL_JS


Let us see this in action. Let us create our custom javascript object.

Navigation: Main Menu > PeopleTools > Portal > Branding > Branding Objects (JavaScript Tab)


JavaScript for Reference:

// Get Image URL for CSK_LOGO;
document.write(unescape("%3Cscript src='/psc/" + site + "/EMPLOYEE/EMPL/s/WEBLIB_FL_CSK.ISCRIPT1.FieldFormula.IScript_Set_Image_URL_Variable?var=cskLogo&img=CSK_LOGO_SVG' type='text/javascript'%3E%3C/script%3E"));


// Print variable using jQuery once the document is ready;
var $jq = jQuery.noConflict();


$jq(document).ready(function(){
  alert(cskLogo);
});


What does this JavaScript do?
- Calls IScript (IScript_Set_Image_URL_Variable) and passes two variables (var - variable name to store image URL; img - image object name).
- Prints variable using jQuery once the document is ready for testing purposes.

Note: I previously injected the delivered jQuery javascript PT_JQUERY_1_6_2_JS object which is how I am able to use jQuery in the above javascript.

Let us now inject this javascript into Fluid UI using the Fluid Bootstrap javascript created in the previous section.


Now if we try to access any Fluid content then we should get the alert message that displays the variable cskLogo with the relative image URL substitution.


We can also access the IScript directly on the browser to see what it does behind the scenes.


In the next post, I intend to cover some advanced Fluid branding concepts such as image replacement techniques without customizations (using the utilities detailed in this post) and more. Stay tuned!

Note: You could enhance the utilities detailed in this post by writing your own custom meta-HTML which is a topic described in great detail by Jim Marion in his book,  PeopleSoft PeopleTools: Tips and Techniques - Chapter 9 - Page 350.

Sunday, June 21, 2015

PeopleTools 8.54+ - Branding - Part 4B - Customizing DEFAULT_THEME_TANGERINE_ALT Theme (Continued)

This post (Part 4B) is a continuation of one of my previous Branding articles on customizing the DEFAULT_THEME_TANGERINE_ALT theme (Part 4A).

In part 4A, we saw how we could override the logo image while using the DEFAULT_THEME_TANGERINE_ALT theme.

Result:


In this post we will see how we can further customize this theme which was cloned from DEFAULT_THEME_TANGERINE_ALT.

Override Branding Header Background Image:

The background image on the Branding Header is generated by the following style.


Let us override this style to use a custom image.

Custom Image: CSK_HEADERBG_ALT


Custom Style:

/* Branding Header Background Color */
#ptbr_header_container #pthdr2container.pthdr2container {
  background-image: url(%image(CSK_HEADERBG_ALT));
}

The additional custom selector (highlighted above) was added to provide a higher precedence to the custom style.


Test Changes:

Recommendations if you are experiencing caching issues.
  1. Clear local browser cache.
  2. Shutdown, purge and reboot the web server(s).


We can see that the branding header background color change has taken effect.

Overriding the NavBar Background Image:

The NavBar background image is generated by the following style.


Custom Image: CSK_NAVBARLINK_BG_ALT


 Main Menu > PeopleTools > Portal > Branding > Branding Objects (Image Tab)


Custom Style:

/* NavBar Background Color */
#pthdr2navbarlinks.pthdr2navbarlinks #pthdr2navbar_div #pthdr2navbar {
  background: url(%image(CSK_NAVBARLINK_BG_ALT)) repeat-x scroll 0 0 transparent; 
}

The additional custom selector (highlighted above) was added to provide a higher precedence to the custom style.


Test Changes:

Recommendations if you are experiencing caching issues.
  1. Clear local browser cache.
  2. Shutdown, purge and reboot the web server(s).


Overriding the Drop Down Menu Background Image:

The drop down menu background image is generated by the following style.


Custome Image: CSK_BREADCRUMB_ALT


Custom Style:

/* Drop Down Menu  Background Color */
#ptdropdownmenu.ptdropdownmenu {
  background: url(%image(CSK_BREADCRUMB_ALT)) repeat scroll 0 0 transparent;
 }

The additional custom selector (highlighted above) was added to provide a higher precedence to the custom style.


Test Changes:

Recommendations if you are experiencing caching issues.
  1. Clear local browser cache.
  2. Shutdown, purge and reboot the web server(s).


Override Drop Down Menu Font Color:

The drop down menu font color is generated by the following style.


Custom Style:

/* Drop Down Menu Font Color */
#ptdropdownmenu .pthnav a.pthnavbcanchor, #ptdropdownmenu .pthnav a.pthnavbcanchor:hover, #ptdropdownmenu .pthnav a.pthnavbcanchor:focus, #ptdropdownmenu .pthnav #pthnavbc li a, #ptdropdownmenu .pthnav #pthnavbc li a:hover, #ptdropdownmenu .pthnav #pthnavbc li a:focus {
  color: #284562 !important;
}

The additional custom selector (highlighted above) was added to provide a higher precedence to the custom style.


Test Changes:

Recommendations if you are experiencing caching issues.
  1. Clear local browser cache.
  2. Shutdown, purge and reboot the web server(s).


Override System Links Font Color:

The system links font color is generated by the following style.


Custom Style:

/* System Header Links Font Color */
#pthdr2container.pthdr2container a.PSHYPERLINK, #pthdr2container.pthdr2container a.PSHYPERLINK:hover, #pthdr2container.pthdr2container a.PSHYPERLINK:visited {
  color: #284562;
}

The additional custom selector (highlighted above) was added to provide a higher precedence to the custom style.


Test Changes:

Recommendations if you are experiencing caching issues.
  1. Clear local browser cache.
  2. Shutdown, purge and reboot the web server(s).


Override Drop Down Menu and 'Add To' Menu - Active Background Color:


Custom Styles:

/* Add To Drop Down Background Color (Active) */
#pthdr2navbarlinks.pthdr2navbarlinks #pthdr2addto_div.active {
  background-color: #FFFFFF;
  border: 1px solid #666666;
}

/* Drop Down Menu Navigation Background Color (Active) */
.pthnav .pthnavbaropen {
  background-color: #FFFFFF;
}

The additional custom selector (highlighted above) was added to provide a higher precedence to the custom styles.


Test Changes:

Recommendations if you are experiencing caching issues.
  1. Clear local browser cache.
  2. Shutdown, purge and reboot the web server(s).


Override Drop Down Menu Icon Images:


Custom Images:

CSK_HNAV_ALT_FAV_SEP


CSK_HNAV_ALT_BC_DOWN_ARROW


CSK_HNAV_ALT_HIERARCHY_SEP


Custom Styles:

/* Drop Down Menu Down Arrow Image */
#ptdropdownmenu.ptdropdownmenu .pthnavbarfldr:after {
  content: url(%image(CSK_HNAV_ALT_BC_DOWN_ARROW));
}

/* Drop Down Menu Fav Icon Separator Image */
#ptdropdownmenu.ptdropdownmenu li#pthnavfavsep {
  background-image: url(%image(CSK_HNAV_ALT_FAV_SEP));
}

/* Drop Down Menu Hierarchy Separator Image */
#ptdropdownmenu.ptdropdownmenu li.pthnavhiearchysep:before {
  content: url(%image(CSK_HNAV_ALT_HIEARCHY_SEP));
}

The additional custom selector (highlighted above) was added to provide a higher precedence to the custom styles.


Test Changes:

Recommendations if you are experiencing caching issues.
  1. Clear local browser cache.
  2. Shutdown, purge and reboot the web server(s).


Override System Link Icons and NavBar Icon Images:


Custom System Link Icon Images:

CSK_HEADERLINK_HOME_ALT:


CSK_HEADERLINK_SEP_ALT:


Custom NavBar Icon Images:

CSK_ADDTOLINK_ARROW:


CSK_HEADER_ALERTS (SVG image):


CSK_HEADER_NAVBAR (SVG image):


Custom Styles:

/* Home Icon Image */
#pthdr2container.pthdr2container #pthdr2home {
  background: url(%image(CSK_HEADERLINK_HOME_ALT)) no-repeat scroll left center transparent;
}

/* System Header Links Separator */
#pthdr2container.pthdr2container .pthdr2sep {
  background: url(%image(CSK_HEADERLINK_SEP_ALT)) no-repeat scroll center center transparent;
}

/* Add To Drop Down List Down Arrow Image */
#pthdr2navbarlinks.pthdr2navbarlinks #pthdr2addto:after {
  content: url(%image(CSK_ADDTOLINK_ARROW));
}

/* Notification Icon Image */
#pthdr2navbarlinks #pthdr2notify_div #pthdr2notify span {
  background: url(%image(CSK_HEADER_ALERTS)) no-repeat scroll center 8px transparent;
}

/* NavBar Icon Image */
#pthdr2navbarlinks #pthdr2navbar_div #pthdr2navbar span {
  background: url(%image(CSK_HEADER_NAVBAR)) no-repeat scroll center 8px transparent;
}

The additional custom selector (highlighted above) was added to provide a higher precedence to the custom styles.


Test Changes:

Recommendations if you are experiencing caching issues.
  1. Clear local browser cache.
  2. Shutdown, purge and reboot the web server(s).


Add a Hyperlink to the Branding Logo:

In this section we will see how we can add a hyperlink to the branding logo. This would be useful in cases where we might want to link the logo to another website.

Create Custom URL:


Modify existing style for the Branding Logo:

Comment the content property.


Modify the logo element in the custom Header Definition:

PeopleTools > Portal > Branding > Define Headers and Footers


We replaced the existing Static HTML (which was a non-breaking space - &nbsp;) with an anchor element referencing the URL Definition (href), Image Object (img element) and URL Definition Description (title).

HTML for reference:
<a href='%URL(CSK_LOGO_URL)'>
   <img src='%image(CSK_LOGO)' title='%URL(CSK_LOGO_URL, DESCR)' style='border: none;'></img>  
</a>

Test Changes:

Recommendations if you are experiencing caching issues.
  1. Clear local browser cache.
  2. Shutdown, purge and reboot the web server(s).


Display Database Name on the Branding Header:

Most organizations would like to print the name of the database on the branding header for test environments (e.g.: DEV, TST, UAT, etc). Let us see how we can display the database name on the branding header.

Additionally, we will use a custom javascript object to write some conditional logic to only display the database name if it is a non-production environment. This helps us to keep the header "clean" for production but display the database name only for testing (non-production) environments.

Create Custom Javascript Object:


if ("%dbname" !== "PROD_DBNAME")
{

   // create div for dbname
   var dbname = document.createElement("div");

   // set attributes and innerHTML
   dbname.setAttribute("id","cskdbname");
   dbname.setAttribute("class","cskdbname");
   dbname.innerHTML = "<p>%dbname</p>";

   // insert dbname div after the cskhdrlogo div
   var logo = document.getElementById("cskhdrlogo");
   document.getElementById("pthdr2container").insertBefore(dbname, logo.nextSibling);

}

Note: In the javascript, replace PROD_DBNAME with the actual name of your Production Database.

Create Custom Style for Database Name:

/* Database Name Text Style */
#pthdr2container.pthdr2container #cskdbname.cskdbname {
    display: inline-block;
    color: #284562;
    margin: 0 5em;
    vertical-align: super;
    font-family: Arial,Helvetica,sans-serif;
    font-size: 12pt;
    font-weight: bold;
    float: left;
}


 Add a new leaf element to represent the database name on the Branding Header Definition:

We will add a new child element under the pthdr2container. This element is a basic javascript type (cskdbname) which is ordered after the cskhdrlogo element.


Test Changes:

Recommendations if you are experiencing caching issues.
  1. Clear local browser cache.
  2. Shutdown, purge and reboot the web server(s).


Display Dynamic and User Specific Greeting Message:

In this section, let us see how we can modify the Branding Header definition to display a dynamic greeting message for the users.

The personalized greeting message would display the text "Welcome to CSK " appended with the User's Description text using the %UserDescription system variable.

Let us assume we want to display this greeting message at the bottom of the 'Add To' menu.


Before we add the message, let us make a little bit of room by moving the 'Add To' menu to the top.

Move elements using CSS:

Custom Style:

/* Add To Drop Down Menu Position (Align to the top) */
#pthdr2navbarlinks.pthdr2navbarlinks #pthdr2addto_div {
  vertical-align: top;
}


Result:


Add a Child Element under pthdr2navbarlinks:

This will serve as a container for holding both the 'Add To' menu and the new custom greeting message.


Custom Style for cskhdr2navbarcontainer:

/* Style for custom container in navbar */
#cskhdr2navbarcontainer.cskhdr2navbarcontainer {
  position: relative;
  float: left;
  height: 57px;
}


Move 'Add To' Drop Down Menu under cskhdr2navbarcontainer:

Let us set the parent for 'pthdr2addto' element as 'cskhdr2navbarcontainer'.


Result:


Create Custom Branding Element Type for Greeting Message:

Main Menu > PeopleTools > Portal > Branding > System Data > Define Element Types


Note: The implementation details for the Custom App Class CSKGreetingText is exactly the same as in my previous post - PeopleTools 8.54 - Branding - Part 3 (Please refer Display Dynamic and User Specific Greeting Message using Custom Branding Elements section).

Add custom 'Greeting Message' element to the Branding Header:

Add 'cskgreetingmessage' element under 'cskhdr2navbarcontainer' using 'CSK Personalized User Greeting' as the element type.


Add custom style for the Greeting Message:

/* CSK Personalized Greeting Message */
#pthdr2navbarlinks.pthdr2navbarlinks #cskgreetingmessage.cskgreeting {
  position: absolute;
  bottom: 0px;
  right: 10px;
  color: #284562;
  font-family: Arial,Helvetica,sans-serif;
  font-size: 12pt;
  font-weight: normal;
}


Test Changes:

Recommendations if you are experiencing caching issues.
  1. Clear local browser cache.
  2. Shutdown, purge and reboot the web server(s).


Add Custom Links to the Branding Header System Links:

In this section let us see how we can add some useful links (for pages of interest such as Process Monitor and Report Manager) to the System Links section on the Branding Header.


Create Custom Element Types for Process Monitor and Report Manager Links:

Main Menu > PeopleTools > Portal > Branding > System Data > Define Element Types

Process Monitor:


Report Manager:


Note: The implementation details for the Custom App Classes ProcessMonitorLink and ReportManagerLink are exactly the same as in my previous post - PeopleTools 8.54 - Branding - Part 3 (Please refer Application Class Implementation for Process Monitor AND Application Class Implementation for Report Manager sections).

Add Process Monitor and Report Monitor Elements to Branding Header:


Test Changes:

Recommendations if you are experiencing caching issues.
  1. Clear local browser cache.
  2. Shutdown, purge and reboot the web server(s).


Adjusting the width of the Navigation Breadcrumb Scroll to accommodate the additional links on the Branding Header System Links:

Special thanks to Cache Staheli (see comments below) who pointed out an issue with adding custom links to the System Links. It appears that when we add custom links to System Links, the Navigation Breadcrumb Scroll (which can be seen when the browser width is reduced/limited) overlays with the System Links causing the entire header to render poorly.


Upon inspecting the HTML further, we will find that there is a hard-coded offset (set to 150) injected as part of a javascript.


Let us see how we can override this hard-coding to accommodate our additional custom links. This offset value is set in a javascript that is associated as part of the header definition. Note: This javascript would not be available as a PeopleTools managed object as it is added directly as a static javascript (meaning it cannot be found in App Designer).


Let us go ahead and update this offset value to something that is more appropriate to the current header design.


If you would like to make the offset variable a bit more dynamic then you can use the following JavaScript to replace the Static JavaScript:

// ptHNavSideOffset = 150;
ptHNavSideOffset = document.getElementById("pthdr2syslinks").clientWidth;

This would ensure that the offset is set to the width of the pthdr2syslinks (the container DIV for the Branding Header - System Links).

Test Changes:


Additional Customizations:

Please refer PeopleTools 8.54 - Branding - Part 3 for the following changes (implementation steps are exactly the same):

- Branding the Timeout Popup Warning Message
- Implementing Google Analytics
- Migrating Branding to other environments

Note: For 'Migrating Branding Objects to other environments' please also refer the following links:
Branding Objects - Migration Issue and Workaround
E-PORTAL: Managed Branding Objects are not Accessible in the Target Environment After Migration (Doc ID 2011383.1) 

Adding/Updating the FavIcon for Classic (Included on 2016/04/01):
Refer: FavIcon for Classic